Why Tile Backsplash Installation Matters in Vancouver Homes
Tile backsplash installation Vancouver is one of the most requested kitchen and bathroom upgrades for good reason. Whether you’re planning a custom home, renovating an existing space, or adding a laneway house, a professionally installed backsplash protects your walls, adds style, and increases your property value.
Quick Answer: Finding the Right Backsplash Installer in Vancouver
| What You Need | Where to Look |
|---|---|
| Licensed Contractors | Check Vancouver business licence registry |
| Insured Professionals | Ask for proof of $5 million liability coverage |
| WorkSafeBC Coverage | Verify active coverage for your protection |
| Average Cost | Expect $1,000-$3,000 depending on size and materials |
| Timeline | Most projects take 1-3 days to complete |
A tile backsplash does more than look good. It protects your walls from water damage, grease, and food splatter—critical in Vancouver’s damp climate. It’s also one of the easiest ways to refresh a tired kitchen or bathroom without a full renovation.
The installation process involves careful surface preparation, precise tile placement with proper spacing, and expert grouting and sealing. While DIY is possible for small projects, professional installers bring the tools, techniques, and experience to ensure a flawless finish that lasts.
I’m Gordon Guthrie, a third-generation builder and founder of CoreVal Homes, with decades of experience delivering custom homes and renovations across Greater Vancouver. Throughout my career, I’ve overseen countless tile backsplash installation Vancouver projects, ensuring each meets the highest standards of craftsmanship and durability for homeowners who value quality and long-term performance.
In this guide, we’ll walk you through everything you need to know—from choosing the right tiles and understanding costs, to deciding between DIY and hiring a pro, and what to look for in a qualified installer.

Why a Tile Backsplash is a Smart Upgrade for Your Vancouver Home
Investing in a tile backsplash installation Vancouver is more than just a cosmetic choice; it’s a strategic upgrade that offers multiple benefits for your home. We’ve seen how a well-chosen and expertly installed backsplash can transform a kitchen or bathroom from functional to fabulous, all while providing crucial protection.
First and foremost, a backsplash significantly increases your property value. In the competitive Vancouver real estate market, buyers are often looking for homes that are move-in ready and feature modern, high-quality finishes. A stylish and well-maintained tile backsplash signals attention to detail and a commitment to quality upgrades, making your home more appealing and potentially fetching a higher price. It’s an upgrade that pays dividends, both in daily enjoyment and long-term investment.
Beyond aesthetics, a tile backsplash provides essential protection against moisture, grease, and food splatter. Think about the daily life of your kitchen: cooking oils, sauces, and water splashes inevitably end up on the walls behind your stove and sink. Without a protective barrier, these can lead to stained paint, damaged drywall, and even structural issues over time. In Vancouver’s often damp climate, this protection is even more critical. Tiles, especially ceramic and porcelain, are non-porous and form a resilient shield that prevents moisture from seeping into your walls, effectively preventing mould and mildew growth. This makes your kitchen or bathroom a healthier and more durable space.

This protective layer also contributes to significantly easier cleaning. Unlike painted walls, which can absorb stains and require frequent repainting, a tiled surface can be wiped clean with just a damp cloth and mild soap. This makes daily maintenance a breeze and keeps your kitchen and bathroom looking fresh and hygienic with minimal effort.
Finally, the aesthetic improvement a tile backsplash offers is undeniable. It acts as a focal point, tying together your countertops, cabinetry, and overall design scheme. Whether you’re aiming for a sleek, modern look or a rustic, cozy feel, the right tile can lift the entire room. We understand that sometimes, small changes can make the biggest impact, preventing common renovation regrets.
We invite you to explore our Portfolio: Kitchen Renovation to see how a well-executed backsplash can improve a kitchen’s appeal. For more insights on avoiding pitfalls, you might find our article on Common Kitchen Renovation Regrets and How to Fix Them Without Starting Over helpful.
Planning Your Project: Costs, Tiles, and Trends in Vancouver
A successful tile backsplash installation Vancouver project begins with careful planning around costs, materials, and design. Here’s what to consider for your Vancouver home.
Understanding the Average Cost of Tile Backsplash Installation in Vancouver
Budgeting for a tile backsplash installation Vancouver is easier when you know the typical costs. Based on our experience, the average project ranges from $1,000 to $3,000. This estimate can vary based on several key factors:
- Labour and Materials: The cost is driven by professional labour, the price of your chosen tile (ceramic is often more affordable than natural stone), and the project’s size (square footage).
- Complexity: Simple subway tile patterns cost less than intricate designs like herringbone, which require more cuts and precision.
- Wall Preparation: Removing an old backsplash or repairing the wall surface will add to the overall cost.
- Additional Supplies: Mortar, grout, and sealers are also part of the budget.
We recommend getting a detailed, written quote to ensure transparency. A typical installation takes one to three days.
Popular Tile Choices and Design Trends
Vancouver homeowners appreciate good design, and several tile choices and trends stand out for backsplashes. The right tile should match your style and withstand daily use.

Here are some popular options:
- Ceramic Tiles: A versatile, durable, and affordable favourite. They come in countless colours and patterns, are easy to clean, and are relatively simple to install.
- Porcelain Tiles: Exceptionally strong and water-resistant, porcelain is ideal for kitchens and bathrooms. It can mimic the look of natural stone or wood with superior durability.
- Natural Stone Tiles: Materials like marble, granite, and quartz offer timeless luxury. They carry a higher price and require more maintenance (sealing), but their natural beauty is best.
- Glass & Mosaic Tiles: Add a pop of colour and sophistication. Mosaics allow for intricate, custom patterns, while luminous glass tiles can brighten a space.
Current design trends in Vancouver include:
- Subway Tiles: A timeless classic, popular in traditional, stacked, or herringbone layouts.
- Large-Format Tiles: Create a sleek, modern look with fewer grout lines, making a space feel larger and easier to clean.
- Herringbone and Chevron Patterns: These dynamic patterns add a sophisticated flair to high-end renovations.
- Unique Shapes: Geometric, arabesque, and hexagonal tiles are gaining popularity for creating distinctive, modern backsplashes.
Choosing the right tile can be overwhelming. Our team can guide you to ensure your backsplash complements your home’s aesthetic and lifestyle. For more trend ideas, check out our article on 5 Must-Have Vancouver Custom Home Features That Vancouver Families Are Demanding in 2025.
The Professional Tile Backsplash Installation Vancouver Process
A professional tile backsplash installation Vancouver is a multi-step process demanding precision and expertise. At CoreVal Homes, we follow a meticulous approach to ensure a flawless, durable finish. Here’s a look at the typical stages:
Step 1: Preparation and Layout
Proper preparation is the secret to a perfect backsplash and sets the foundation for the entire project.
- Workspace and Surface Prep: We start by clearing and protecting your countertops, floors, and cabinets. We then prepare the wall surface, ensuring it is clean, smooth, and dry. This includes repairing any imperfections and safely removing an existing backsplash if necessary.
- Layout and Planning: To ensure a symmetrical layout, we find the wall’s center and draw level guide lines. This guarantees straight tile rows, even if countertops aren’t perfectly level. We also plan cuts around outlets and other obstacles, installing box extension rings for a seamless finish.
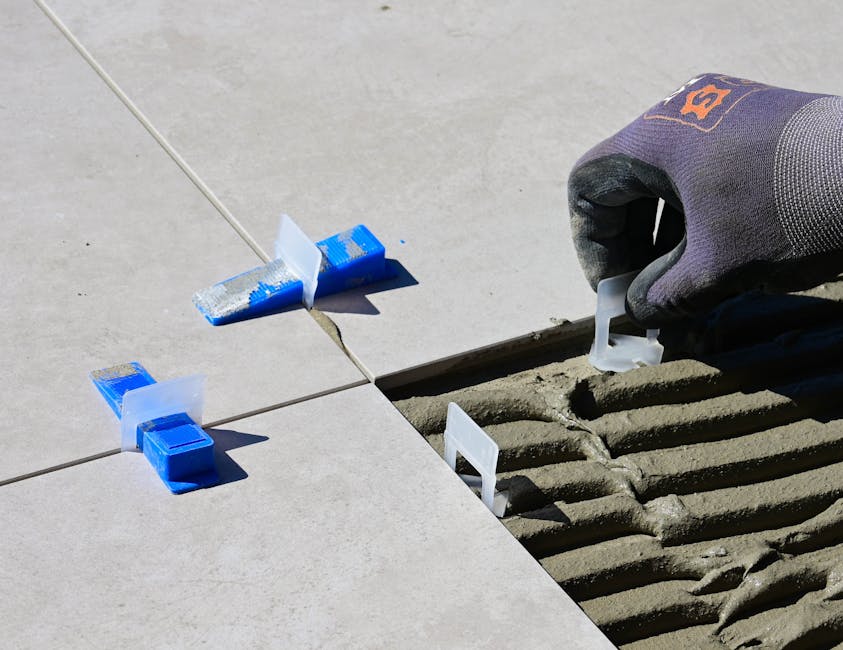
Step 2: Setting the Tiles
With the prep work done, we begin laying the tiles with a steady hand and a keen eye.
- Applying Mortar: Using a notched trowel, we apply the appropriate thin-set mortar for your tile type in small, manageable sections. This creates uniform ridges for excellent adhesion.
- Placing Tiles: We carefully press each tile into the mortar, using spacers to maintain consistent grout lines for a professional look. For larger tiles or natural stone, we may also “back-butter” them with mortar to ensure a stronger bond. You can learn more about this process and other tips in guides like How to Tile a Backsplash – LeafFilter Gutter Protection – CA.
Step 3: Grouting and Sealing
The final steps protect your new backsplash and give it a polished look.
- Applying and Cleaning Grout: After the mortar has cured (typically 24 hours), we remove the spacers and apply grout with a rubber float, ensuring all joints are filled. We then promptly clean excess grout from the tile surfaces with a damp sponge to prevent haze.
- Curing and Sealing: Grout needs 1-3 days to fully cure. Once cured, we apply a high-quality sealant to protect it from stains, moisture, and mildew. This crucial step makes future cleaning easier.
- Caulking Seams: Finally, we apply a clean line of caulk where the backsplash meets the countertop and cabinets. This creates a waterproof seal and provides a finished, professional look.
Hiring a Pro vs. DIY: Making the Right Choice in Vancouver
When planning a tile backsplash installation Vancouver, homeowners often wonder whether to do it themselves or hire a professional. While DIY can seem cost-effective, understanding the differences is key to making the right choice.
Key Differences Between DIY and Professional Installation
This table breaks down the main distinctions between a DIY approach and hiring a professional installer:
| Factor | DIY Installation | Professional Installation |
|---|---|---|
| Cost | Lower upfront labour cost; potential for costly mistakes or re-dos. | Higher upfront cost for labour; long-term value through durability and correct installation. |
| Time | Can be time-consuming for beginners with a steep learning curve. | Efficient, typically 1-3 days; experienced installers work quickly. |
| Quality | Varies by skill; risk of uneven tiles, poor cuts, and improper sealing. | High-quality, precise finish; expertise in complex designs and challenging spaces. |
| Tools Required | Requires purchasing or renting specialized tools (e.g., tile saw, trowel). | Installers arrive with all necessary professional-grade tools. |
| Handling Complexity | Difficult with intricate patterns, uneven walls, or working around outlets. | Skilled in addressing challenges like uneven surfaces and complex cuts. |
| Warranty/Insurance | No warranty; personal liability for errors or damage. | Workmanship warranty; insured against damage or accidents. |
While a simple backsplash may seem like a manageable DIY project, tiling well is a skill. Common mistakes like using the wrong adhesive, creating uneven grout lines, or inadequate waterproofing can lead to costly repairs. We’ve seen homeowners regret cutting corners, as detailed in our thoughts on Home Renovation Timeline: Living on Site vs. Temporary Relocation. Hiring a professional ensures the job is done right the first time, providing a durable, beautiful result and peace of mind.
How to Choose the Best Installer for Your Tile Backsplash Installation Vancouver Project
Selecting the right professional is crucial. Here’s what to look for:
- Credentials: Ensure your installer is fully licensed. You can verify this through the Vancouver business licence registry.
- Insurance and WorkSafeBC: Your contractor must have adequate liability coverage (we recommend at least $5 million insured) and active WorkSafeBC coverage. This protects you from liability for accidents or damage.
- Adherence to Standards: Ask if they follow industry best practices, such as the TTMAC (Terrazzo, Tile & Marble Association of Canada) standards.
- Reputation and Reviews: Look for installers with positive reviews, a strong portfolio, and a good standing with organizations like the BBB-accredited Better Business Bureau. A long-standing presence and positive client feedback are good indicators of reliability.
- Local Experience: Installers familiar with Vancouver’s building codes and climate can provide custom solutions.
- Clear Communication: A good installer offers a detailed, no-obligation estimate and maintains open communication throughout the project.
Following these steps will help you select a qualified professional for a stunning and durable tile backsplash.
Frequently Asked Questions about Backsplash Installation
Here are answers to common questions about tile backsplash installation Vancouver.
How long does a backsplash installation take?
A typical tile backsplash installation Vancouver project takes one to three days. The exact timeline depends on the area’s size, design complexity, tile type, necessary wall preparation, and the required drying times for mortar and grout. A professional installer will provide a clear schedule before starting.
How do I maintain my new tile backsplash?
Maintaining your new backsplash is simple and ensures it stays beautiful.
- Regular Cleaning: Wipe down tiles with a damp cloth and mild soap for daily cleaning. Avoid abrasive cleaners that can scratch the tile or damage the grout.
- Grout Sealing: Grout is porous and can stain. We recommend reapplying a grout sealant every one to two years to protect it from moisture and mildew, especially in high-use areas.
- Special Care: Natural stone tiles may require annual sealing. Always clean up acidic spills like tomato sauce or lemon juice promptly to prevent staining or etching.
Can you tile over an existing backsplash?
We generally do not recommend tiling over an existing backsplash. For a high-quality, long-lasting result, removing the old material is the best approach.
Here’s why removal is better:
- Proper Adhesion: New mortar bonds best to a clean, properly prepared wall surface, not an old tile. This prevents future cracking or failure.
- Level Surface: Tiling over an uneven surface results in an uneven finish. Starting fresh ensures the new backsplash is perfectly flat.
- Avoids Bulk: Adding a new layer of tile creates awkward thickness around outlets, switches, and countertops.
- Durability: Removing the old backsplash allows us to inspect the wall for any underlying issues and create a solid foundation for your new tile backsplash installation Vancouver.
Conclusion: Lift Your Home with a Flawless Backsplash
A professionally executed tile backsplash installation Vancouver is more than just an aesthetic improvement; it’s a strategic investment in the beauty, functionality, and longevity of your home. From protecting your walls against Vancouver’s damp climate and daily wear to elevating your kitchen or bathroom’s style and boosting your property value, the benefits are clear.
At CoreVal Homes, we pride ourselves on our commitment to quality craftsmanship and meticulous attention to detail. We understand that for complex renovations or a custom home build, a professional team ensures every detail is handled with precision, from initial design consultation to the final grout seal. Our expertise ensures a smooth, hassle-free process and a flawless result that you’ll cherish for years to come.
Ready to transform your kitchen or bathroom with a stunning new tile backsplash? Explore our Portfolio: Kitchen Renovation for inspiration and contact us to discuss your project. Let us help you create a space that perfectly reflects your style and meets the demands of your Vancouver lifestyle.